Your Trusted Source for Professional Grade
Hidden Cameras, and More
Hidden Cameras, and More
FREE SHIPPING
All US Domestic Orders
All US Domestic Orders


By: SpygearGadgets
APR 6
How to Set Up Your TinyCam Pro WiFi Hidden Spy Camera
1. INTRODUCTION
Today we’re going to be taking a look at how to connect your WiFi hidden camera that utilizes the TinyCam Pro app to your home’s WiFi connection.
The first thing you want to make sure is that your camera does indeed use the TinyCam Pro app, as some of our other cameras use different apps, and they are not interchangeable. So first just double check with the included user manual or documentation with your camera that it does in fact use TinyCam Pro.
2. DOWNLOADING THE APP
The next step is to download and install the TinyCam Pro app to your iOS or Android device.
To do this, browse the App Store or the Google Play store, and search for the free app TinyCam Pro.
You can also scan this QR code with your phone to be taken to the TinyCam Pro download page:

Scan the QR Code to Download the Free App TinyCam Pro
When you open the app, it may prompt you to allow access to find devices on your local network, as well as to allow notifications. Be sure to click Yes for both of these, as this is needed for the app to function properly.
If you are viewing this on your phone, you can click the download link below:
TinyCam Pro for iOS: https://apps.apple.com/us/app/tinycam-pro/id153908...
TinyCam Pro for Android: https://play.google.com/store/apps/details?id=co...
3. INSERT A MICRO SD CARD
After you’ve got the TinyCam Pro app installed, the next step is to insert a micro SD memory card into your hidden camera. Cameras that uses the TinyCam Pro app accept up to a 128GB memory card, which allows you to save recorded video.
This step is optional - you do not need to use a memory card if you just want to be able to live view your camera feed, a memory card is only needed if you want to save video for later viewing.
If you’d like to insert a memory card, do so with the camera powered OFF, insert the card until you feel it snap into place.
The memory card slot for each device is in a different spot, so refer to the included user manual for the exact location of your camera's memory card slot.
4. TURN THE CAMERA ON
Next, you’ll want to make sure your camera is either connected to AC power, or if it uses battery power, that the battery is fully charged. For the setup process we always recommend keeping the device connected to AC power, even if it is a battery powered camera. That will ensure constant power to the device during the setup process.
Once you’ve plugged it into AC power, locate and press the power button for the device. Depending on which camera model you have, the LEDs will be located in different places. For example, on the 1080P HD WiFi DIY Pinhole Camera Kit, the LEDs are simply on the main part of the camera kit. But for the Mini Alarm Clock Spy Camera, the LEDs are hidden slot is hidden under the back cover.
During this part of the setup process the camera will start transmitting its own WiFi signal for setup, so keep your phone within a few feet of the camera for this part.
5. CONNECT TO THE CAMERA’S WIFI
Let the camera boot up for a couple minutes so that it’s fully initialized, and after a couple minutes, go to your camera’s list of available WiFi networks, and locate the WiFi network that starts with AIS, and click on it to connect.
Wait for the WiFi icon to appear in the top task bar, which may take up to a minute or so. The WiFi network will then say Connected, with a checkmark next to it:
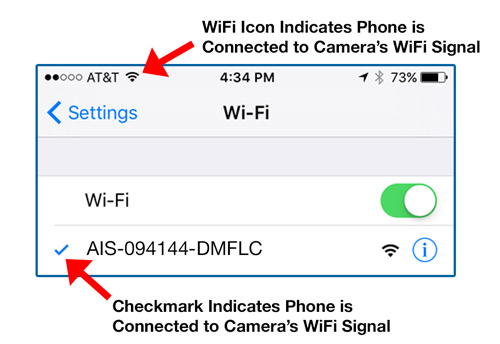
Connect to Camera's WiFi Signal
You may see a warning message that says “No Internet Connection” under the WiFi name, this is normal to see during this part of the setup process. You may also see a pop up message during the setup process as well, if you do, click the “Keep Trying WiFi” option.
Now, open up the Tinycam Pro app, and click the plus button at the bottom of the app to begin adding your camera:

Click the Plus Button to Add the Camera to App
On the next screen, the app should start searching for your camera, and it should automatically find the camera. Click the Add button, and this will add the camera to the app:
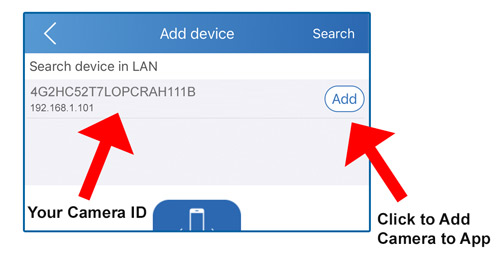
Camera Will Be Automatically Found by the App
NOTE: If you don’t see your camera listed here, you are not connected to the camera’s WiFi, so go back to your WiFi settings and make sure to connect to the camera’s WiFi.
6. CONNECTING TO YOUR HOME’S WIFI
Connecting the camera to your home’s WiFi is how you’ll be able to remotely watch your video feed when you’re away from your house.
In the app screen, you should now see your camera listed. To begin connecting the camera to your home’s WiFi, click the gear icon on the bottom right:
![]()
Click the Gear/Settings Icon to Begin Connecting to Home WiFi
Next, click the WiFi Config Icon:
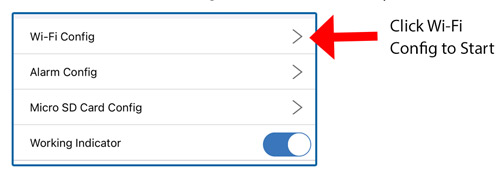
Click the WiFi Config Option Next
You'll then see a list of the nearby WiFi networks. Click on your home’s WiFi network, enter the password, and click Next to connect:
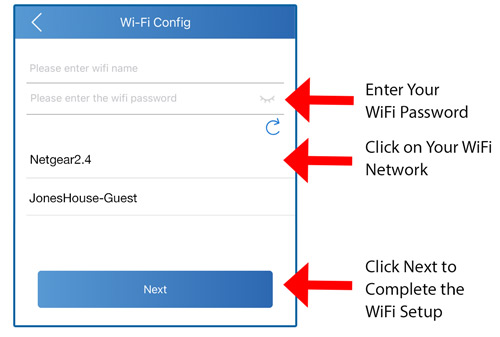
Click on Your WiFi Network and Enter Your WiFi Network Password
Expert Tip: Some TinyCam Pro models can connect only to 2.4GHz WiFi networks, while some can connect to both 2.4Ghz AND 5.8Ghz WiFi networks. Refer to the documentation with your camera if you are unsure which your camera is.
Once you click next, the camera will start connecting, and will take up to about 60 seconds. Once that process is complete, you’ll see a green checkmark letting you know the connection is successful:
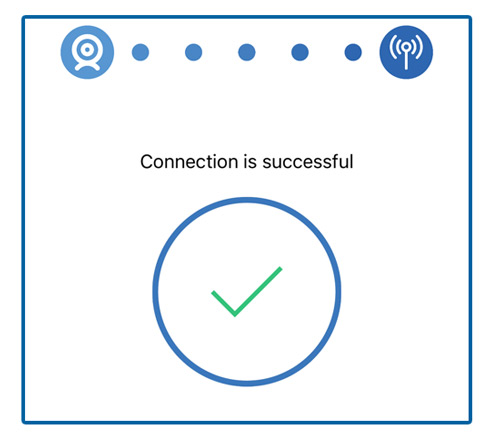
Click on Your WiFi Network and Enter Your WiFi Network Password
Congratulations, the WiFi connection is now finished, and you’ll be able to remotely view your camera feed from anywhere in the world.
7. CHANGING YOUR CAMERA PASSWORD
We’ll have another video that goes into detail about the TinyCam Pro app and how to adjust all the various settings, but for now we’re just going to look at how to change one setting, which is the most important one - how to change your camera’s password.
Changing your camera’s password is VERY IMPORTANT and should be the first thing you do to ensure your camera feed is secure.
To change your camera’s password, click the gear icon again, click Device Password, then you'll see the password change box:
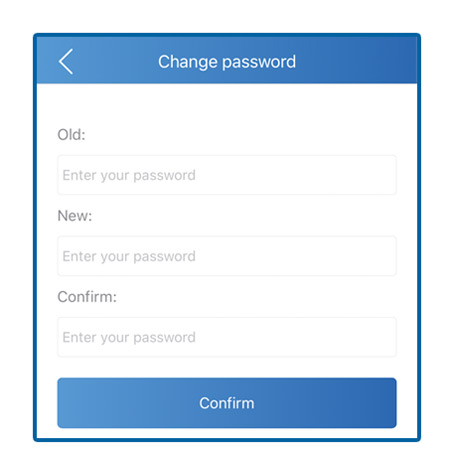
Be Sure to Change Your Camera Password to Something Secure
Enter the old password, which is "123456" (without the quotes), then enter your new password twice, and click Confirm.
Be sure to write down your password somewhere safe, like in the included manual. If you forget the password and you need to reinstall the app, you’ll have to reset the camera back to factory defaults.
Original Post Date: 04/06/2023
Recent Posts
Browse By Tag:


 How do Hidden Cameras Work?